
| 일 | 월 | 화 | 수 | 목 | 금 | 토 |
|---|---|---|---|---|---|---|
| 1 | ||||||
| 2 | 3 | 4 | 5 | 6 | 7 | 8 |
| 9 | 10 | 11 | 12 | 13 | 14 | 15 |
| 16 | 17 | 18 | 19 | 20 | 21 | 22 |
| 23 | 24 | 25 | 26 | 27 | 28 | 29 |
| 30 |
- 멀티바이트 문자 집합 사용
- wxWidget
- 설치 테스트
- SQLite3
- c2678
- c++ set struct
- c++ Broadcast
- esp-wroom-32d
- 사전설치
- winsock.h Broadcast
- Plugins
- 정적 라이브러리에서 MFC 사용
- OpenXLSX 한글
- _sprintf
- ExtendWith
- .gitattributes
- Console
- 의존주입
- __vsnprintf
- OpenCPN
- OpenCPN설치
- MFC
- 확인할 수 없는 외부 기호
- git 최초 설정
- Flutter
- Mqtt
- __snprintf
- sts4
- git 대용량 파일
- LINK2001
- Today
- Total
세상을 이롭게
[Flutter] 01. 설치하기 MAC / VSCODE 본문
개발환경
macOS Catalina ver 10.15.7
MacBook Pro (15-inch, 2019)
iterm2(zsh)
VSCode 설치
아래의 링크에서 mac버전의 vscode을 다운받는다.
https://code.visualstudio.com/
Visual Studio Code - Code Editing. Redefined
Visual Studio Code is a code editor redefined and optimized for building and debugging modern web and cloud applications. Visual Studio Code is free and available on your favorite platform - Linux, macOS, and Windows.
code.visualstudio.com
VSCode 에서 Flutter 를 열어 개발할 수 있게 플러그인을 install 한다. 추가로 사용하고 싶은 것이 있다면 install 해준다.

Flutter SDK 설치
https://flutter.dev/docs/get-started/install/macos
macOS install
How to install on macOS.
flutter.dev
flutter_macos_2.0.6-stable.zip 을 다운받을 수 있었다.

1번 2번은 문제없이 할 수 있었다. 경로는 [user]/SDKs 경로로 지정하였다.
3번을 보는 순간 본인은 이게 뭔데... 라고 찾아보니 임시 환경변수 설정이라고 한다. 이건 아니다 싶은 반항심이 생겼다.
더 찾아보았더니 영구적으로 경로를 추가하는 방법이 있다 한다. 그 길로 안내하도록 하겠다.

$ ls -la
명령어를 통해 .bash_profile 파일이 있는지 확인하고 없으면 만들어 준다.(아마 아무도 없을껄?)
$ vi ~/.bash_profile
본인은 없으므로, 명령어를 통해 새로 생성했다.

내용은 [ export PATH="$PATH:'pwd' /flutter/bin" ] 을 넣어준다.
vi 로 열었으니 a 를 입력하여 INSERT MODE 로 입력후 esc -> :wq (저장 후 종료) 해준다.
$ source ~/.bash_profile
을 통해 적용해준다.
$ echo $PATH 로 확인한다.
안되면
$open .bash_profile 한번더 확인해보고 다시 적용
이후 터미널을 재부팅하여 설정을 불러온다.
* vi 사용법은 이 블로그에 잘 정리되어 있었다. https://blockdmask.tistory.com/25
[vi 명령어] vi 명령어 정리
[리눅스나 유닉스에서 사용하는 vi 편집기 명령어 총 정리 입니다.] <목차> 1. vi 편집기 명령어 전체 구조 살펴보기 2. vi 명령어 총정리 (자주 사용하는 것은 색으로 표시) 3. 제가 진짜로 사용하는
blockdmask.tistory.com
방금까지 나는 되는척을 했다. 여기까지 해서 될줄 알았던 분들 되면 감사하고 아니면 혹시? 하고 봐주시라....
사실 나에게 flutter는 사치였는지 명령어를 찾을 수 없다는 소리만 낸다.
즉 제대로 적용되지 않았다는 말이다. 이유를 찾아보자 zsh 를 사용하고 있었기 때문이였다.
공식 가이드는 .bash_profile. 최신 mac_os에서 bash 쉘은 zsh 쉘로 대체되었으므로 .zprofile파일 을 수정해야 합니다.
파일은 홈 디렉토리에 있습니다.
https://stackoverflow.com/questions/58400500/zsh-command-not-found-flutter
zsh: command not found: flutter
Recently I updated Mac OS to latest Catalina and my terminal which is using zsh now start showing me following error: zsh: command not found: flutter It was working fine before update.
stackoverflow.com
$ vi ~/.zshrc
$ export PATH=$PATH:[PATH TO FLUTTER]/flutter/bin (remember I don't have double quotes here)
$ source ~/.zshrc
이렇게 하니 적용 되었다. 참고하시라.
$ flutter 가 잘 된다면
$ flutter precache
명령어를 통해 개별 바이너리를 설치한다.(왜일까)


https://guides.cocoapods.org/using/getting-started.html#installation
CocoaPods Guides
CocoaPods is fully open-sourced, so it depends on community contributions to get better. If you're looking to start working on CocoaPods, this is the place to start.
guides.cocoapods.org
이것부터 설치 하겠습니다.
$ sudo gem install cocoapods
안된다....
그래서 아래와 같은 방법으로 해보았다.
https://stackoverflow.com/questions/61867107/zsh-command-not-found-pod-macos-catalina-10-15
zsh: command not found: pod - MAcOS Catalina 10.15
I'm running the install with an admin account I tried sudo gem install cocoapods and sudo gem install cocoapods -n /usr/local/bin They both run fine with following output Fetching cocoapods-1....
stackoverflow.com

rvm 설치를 이야기하는데... 이것도 안되었다. 아래와 같은 애러가 나는 상황. 본인은 먹이를 찾아 떠나는 맹수처럼 해결방법을 찾아냈다.
export RBENV_ROOT=/usr/local/var/rbenv
eval "$(rbenv init -)"

방법을 찾아보니, https://www.jessesquires.com/blog/2020/08/26/zsh-could-not-find-cocoapods/
zsh could not find CocoaPods
Out of nowhere today, when I tried to run pod install on my machine, it could not be found. Uh… what?
www.jessesquires.com
export RBENV_ROOT=/usr/local/var/rbenv eval "$(rbenv init -)" 적용


되...된다. pod init 을 하면, [!] No Xcode project found, please specify one 이렇게 나오지만 일단 통과한듯 하다.
$ flutter doctor

이제 Android SDK 만 설치하면 된다!
https://developer.android.com/studio/index.html
Download Android Studio and SDK tools | Android 스튜디오
developer.android.com
위 링크로 들어가 Andriod Studio 를 다운받아주자.


하지만 Android SDK를 읽지(?) 못하였다.
어디에 위치하는지 모르기 때문에(찾지않을거다) 다른 방법을 알아보았다.
https://stackoverflow.com/questions/33590300/recommended-zshrc-settings-for-android-sdk
Recommended .zshrc settings for Android SDK
# Path to your oh-my-zsh installation. export ZSH=/Users/baby/.oh-my-zsh # Set name of the theme to load. # Look in ~/.oh-my-zsh/themes/ # Optionally, if you set this to "random", it'll load a
stackoverflow.com

$ vi .zshrc
안에 아래를 넣어주고
$ source .zshrc
로 적용해준다.
export ANDROID_HOME=/usr/local/opt/android-sdk
path=("${ANDROID_HOME}/platform-tools:${ANDROID_HOME}/tools" $path)
.zshrc 에 경로를 추가해 주고 (여기까지하면 안된다) brew를 이용해 다시 깔았다.

brew 로 install했으니 brew가 어디에 설치했는지 알아야겠죠?
https://stackoverflow.com/questions/26209083/where-does-homebrew-install-android-sdk
Where does homebrew install android-sdk?
Where does homebrew install the android-sdk when you run the command: brew cask install android-sdk I want to be able to add it to the PATH.
stackoverflow.com

을 해주라 하였지만 내 맥북에서는
https://www.pieceofcode.blog/2017/09/android-sdk-cli-with-studio/
Use android-sdk from Homebrew with Android Studio
I recently got a great idea for a mobile app. As I’ve used react and java in the past, but not objective-c and swift, I saw an opportunity to try React Native. On the Getting Started-guide there’re instructions for installing and configuring Android St
www.pieceofcode.blog
/usr/local/share/android-sdk 이 경로안에있었다.
$ vi .zshrc 에서 경로를 다시 잡아주자.
위에서 추가해 뒀던
export ANDROID_HOME=/usr/local/opt/android-sdk
에서
export ANDROID_HOME=/usr/local/share/android-sdk
로 바꾸어 주었다.
$ source .zshrc 로 적용해주기.
안된다.
----------------------------------------------------------------------------------------------------------------------
https://stackoverflow.com/questions/34532063/finding-android-sdk-on-mac-and-adding-to-path
Finding Android SDK on Mac and adding to PATH
I have installed Android Studio on my MacBook Air (OS Version 10.11 El Capitan) and have successfully written a small "hello, world" app and installed on device (Nexus 7) and ran on AVD. All I wan...
stackoverflow.com
export PATH="${HOME}/Library/Android/sdk/tools:${HOME}/Library/Android/sdk/platform-tools:${PATH}"
추가해주자

라이센스만 적용해주면 끝나겠다.
https://stackoverflow.com/questions/46402772/failed-to-install-android-sdk-java-lang-noclassdeffounderror-javax-xml-bind-a
Failed to install android-sdk: "java.lang.NoClassDefFoundError: javax/xml/bind/annotation/XmlSchema"
When installing the android sdk tools the following error is emitted: java.lang.NoClassDefFoundError: javax/xml/bind/annotation/XmlSchema Why is this happening and how can it be fixed? Debug o...
stackoverflow.com


accept를 약 7번 묻는다 y 해주면 된다.
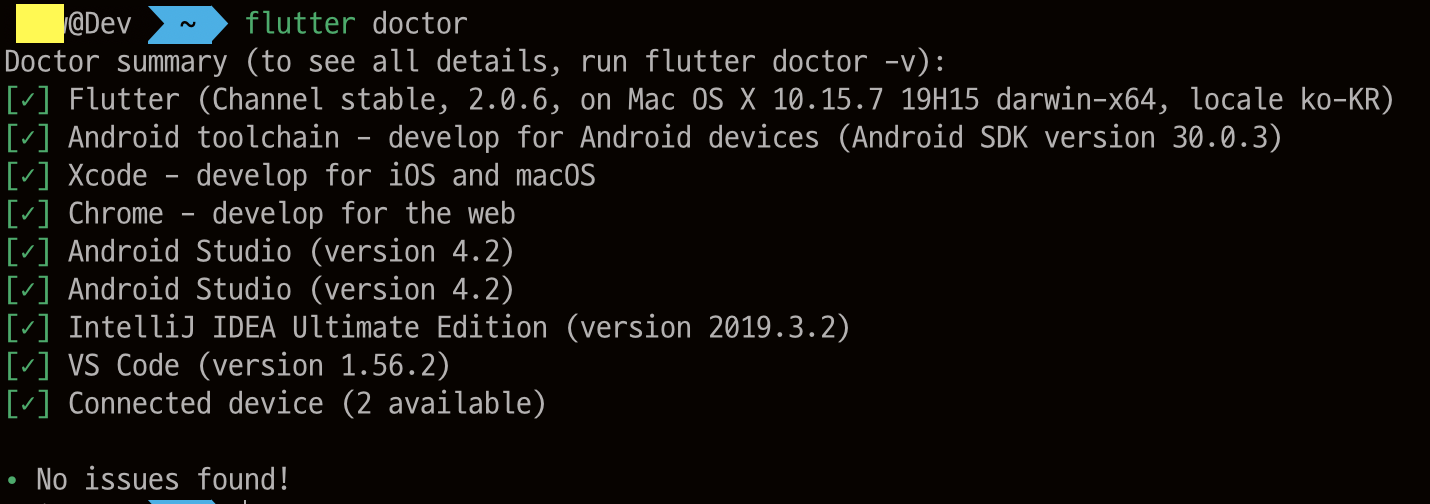
설치 끝. 고생하셨다.
'Flutter' 카테고리의 다른 글
| [Flutter] 04. Flutter 시작하기(Console) (0) | 2021.07.27 |
|---|---|
| [Flutter] 03. channel 선택 및 적용하기 (0) | 2021.07.24 |
| [Flutter] 02. Android로 개발 시작하기 (0) | 2021.05.21 |


