
| 일 | 월 | 화 | 수 | 목 | 금 | 토 |
|---|---|---|---|---|---|---|
| 1 | 2 | 3 | 4 | 5 | 6 | |
| 7 | 8 | 9 | 10 | 11 | 12 | 13 |
| 14 | 15 | 16 | 17 | 18 | 19 | 20 |
| 21 | 22 | 23 | 24 | 25 | 26 | 27 |
| 28 | 29 | 30 | 31 |
- OpenXLSX 한글
- 멀티바이트 문자 집합 사용
- c++ Broadcast
- MFC
- .gitattributes
- wxWidget
- SQLite3
- __snprintf
- OpenCPN
- git 대용량 파일
- Console
- git 최초 설정
- c++ set struct
- winsock.h Broadcast
- 정적 라이브러리에서 MFC 사용
- Flutter
- OpenCPN설치
- _sprintf
- ExtendWith
- Plugins
- __vsnprintf
- Mqtt
- LINK2001
- sts4
- 확인할 수 없는 외부 기호
- c2678
- 사전설치
- 의존주입
- esp-wroom-32d
- 설치 테스트
- Today
- Total
세상을 이롭게
OpenCPN 개발하기 03. OpenCPN 설치하기 본문
이미 앞에서 설치한 내용이다. 내려가면서 확인만 하자.
https://opencpn.org/wiki/dokuwiki/doku.php?id=opencpn:developer_manual:developer_guide:compiling_windows
Compiling on Windows [OpenCPN Manuals]
Get the wxWidgets 3.1.2 sources and build them cd C:\Users\myname\Sources git clone -b v3.1.2 https://github.com/wxWidgets/wxWidgets cd wxWidgets git submodule init git submodule update cd build\msw nmake /f makefile.vc BUILD=release SHARED=1 CXXFLAGS=/D_U
opencpn.org
Prerequisities
-
for OpenCPN v5.0.0
-
with wxWidgets v3.1.2
-
Plugin API starts with API 1.16 (Supports plugins with earlier API but they must be compiled again for OpenCPN v5.0 due to the change in wxWidgets.)
-
Highest chance of success if these steps are followed exactly.
Visual Studio 2017
-
Get Visual Studio Community 2017. Go to this microsoft web page Older Visual Studio and scroll down.
-
Install and select the workload Desktop development with C++ and include component Windows XP support for C++.
-
Also include the appropriate Windows x SDK component. Generally install the most current version, Windows 10 preferred.
Git
-
Get Git for Windows from https://gitforwindows.org
-
Install and let the installer register git in your PATH and select Checkout as-is, commit Unix-style line endings
CMake
-
Get the latest CMake installation packages from https://cmake.org
-
Install and let the installer register in the PATH environment variable
POedit
-
Get the latest POedit installation package from https://poedit.net
-
Install
-
Add C:\Program Files (x86)\Poedit\GettextTools\bin to your PATH
NSIS
-
Download NSIS (Nullsoft Scriptabe Install System) from https://nsis.sourceforge.io/Download
-
Install
7-Zip
-
Download 7-Zip from https://www.7-zip.org/download.html
-
Install
Get the wxWidgets 3.1.2 sources and build them
02 wxWidgets 설치
설치 환경 Windows 10 Pro 64-bit (10.0, Build 19043) Intel(R) Core(TM) i7-10700K CPU @ 3.80GHz (16 CPUs), ~3.8GHz 65536MB RAM 과분하다... 설치 대상 WxWidget ver 3.1.2 C:\OpenCPN_SDK 폴더 생성 후 설치..
94epicenter.tistory.com
여기 까지 완료 되었음을 가정하고 진행하도록 한다.
Getting and building OpenCPN source
Get the OpenCPN sources
5.6.0 버전을 원한다면 https://github.com/OpenCPN/OpenCPN/tree/Release_5.6.0 에서 직접 받자.
cd c:
git clone https://github.com/OpenCPN/OpenCPN

cd OpenCPN
mkdir build
Get prebuilt Windows dependencies
-
Download the dependencies bundle from OpenCPN_buildwin-4.99a.7z


Cmake를 실행합니다.
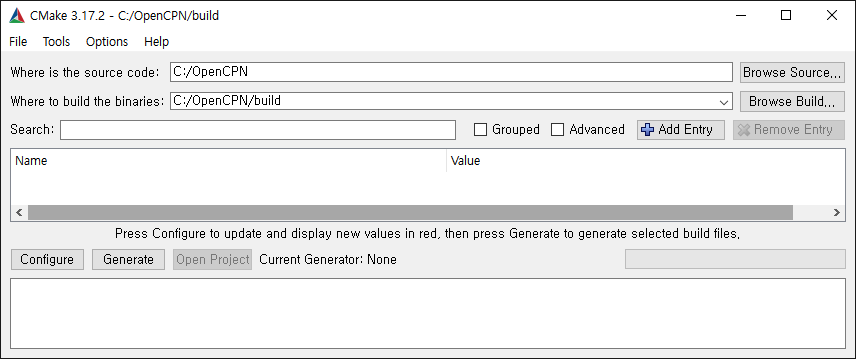
경로를 설정해 주고, 좌측 하단 Configure 버튼을 눌러줍니다.


아래와 같이 wxWidgets 부분의 경로를 잡아주고, Configure 버튼을 누르면 GETTEXT 부분이 생긴다.
GETTEXT 부분의 경로를 잡아주고 다시 Configure 버튼을 눌러준다.
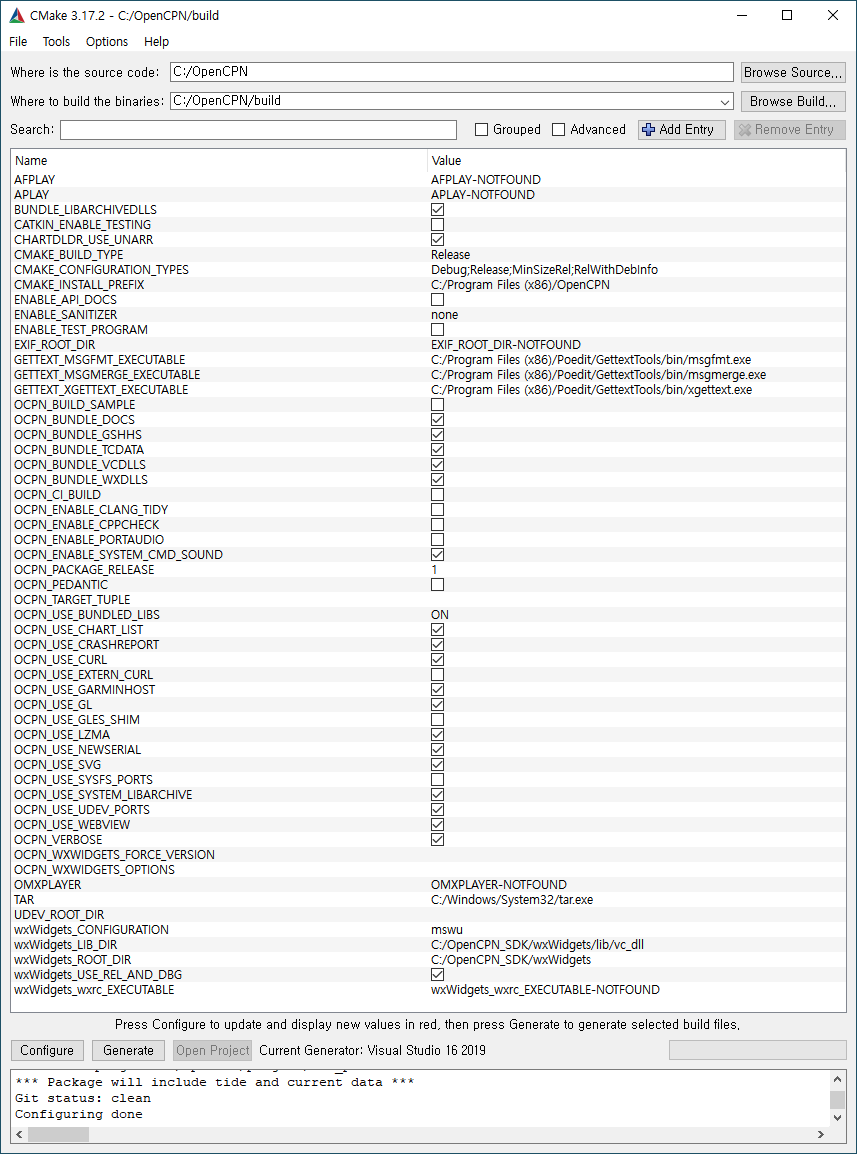
이때 wxWidgets_LIB_DIR 에 경로가 수정된다. ../wxWidgets/lib/vc_dll 로 다시 수정해주자.
Configuring done 이 나오면 성공이다.
Generate 버튼을 누른다.

Generating done 이 나오면 성공이다.
Open Project 버튼을 눌러준다.
First Run
-
Make sure you've downloaded wxWidgets 3.1.2 and compiled them See the paragraph above.
-
Be sure to set environment path for wxWIDGETS_ROOT_DIR
-
First try doing Release or RelWithDebInfo to avoid issues using Debug because of missing wxWidgets debug .dlls.
-
Do not use the “All Build” target. Use the “opencpn” target.
-
Right click on “opencpn” target, and select “Set as StartUp Project”
-
Build the target “opencpn”. Should be able to debug this now.
-
If you get a popup similar to “this DLL can't be found; wxmsw312ud_gl_vc_custom.dll
-
You will need to rebuild wxWidgets in Debug mode if you want to run the OCPN Debug build. Not difficult. See the paragraph above.
-
You can also get useful debugging from the “RelWithDebInfo” build.

C:\OpenCPN_SDK\wxWidgets\lib\vc_lib\mswu -> C:\OpenCPN_SDK\wxWidgets\lib\vc_dll\mswudDebug 에서 해줘야 할 것이다. 꼭 lib -> dll , mswu -> mswud 를 붙여주자. 적용 후 OpenCPN을 빌드한다.

꼭 이런 에러가 난다.

과감없이 날려주고, 빌드를 한다.

Debug 를 돌리기 위해 buildwin과 직접 빌드한 wxWidgets 에 있는 dll 들을 debug 폴더에 넣어주어야 한다.
C:\OpenCPN\buildwin 안의 dll --> C:\OpenCPN\build\Debug 에 복사 붙여넣기
C:\OpenCPN\buildwin\gtk 안의 dll --> C:\OpenCPN\build\Debug 에 복사 붙여넣기
C:\OpenCPN\buildwin\expat-2.2.5 --> C:\OpenCPN\build\Debug 에 복사 붙여넣기
C:\OpenCPN\buildwin\crashrpt --> C:\OpenCPN\build\Debug 에 복사 붙여넣기
C:\OpenCPN_SDK\wxWidgets\lib\vc_dll 안의 dll --> C:\OpenCPN\build\Debug 에 복사 붙여넣기
C:\OpenCPN\data 안의 gshhs , s57data , sounds , tcdata 폴더를 C:\OpenCPN\build 에 복사, 붙여넣기 해준다.
이 상태로 실행을 하면

이런 문구를 볼 수 있다.
uidata 라는 폴더가 없기 때문이다.
코드상으로 보면 이 파일을 읽어 오는 부분이 있기 때문인데, 이 파일의 원본은 설치 파일을 설치하게 되면 그 폴더 안에 생긴다. 다운받아 사용하여도 무방하다. C:\OpenCPN\build 에 넣어주자.
https://download.opencpn.org/s/Feb77BJWFftkiSj
opencpn-msvc_5.6.0_setup.exe
Storage Share - powered by Nextcloud
download.opencpn.org


마지막 opencpn 실행이 실패한 것 같습니다.
플러그인과 문제가 있을 수 있는 기능 없이 안전 모드로 실행하시겠습니까? NO!!!!, YES 하면 실행된다.
실행하게 되면 바다만 보이는 상태일 수 있다.
C:\ProgramData\opencpn\opencpn.iniBasemapDir=C:\\OpenCPN\\build\\gshhs\\
경로가 잘못되어있다면 수정해주거나, ini 파일을 삭제하면 다시 생기면서 잘 보이게 된다.
https://www.ngdc.noaa.gov/mgg/shorelines/gshhs.html
해안선이 궁금하면 찾아보자. 다음에 더 찾아서 보강하겠다.

일단 이렇게 설치에 관한 부분은 마무리 한다.
'OpenCPN' 카테고리의 다른 글
| OpenCPN 개발하기 04. Plugin 준비 및 테스트(Release) (0) | 2022.04.01 |
|---|---|
| OpenCPN Plugins 로드에러 (0) | 2022.03.31 |
| OpenCPN 개발하기 04. Plugin 준비 및 테스트 (0) | 2022.01.26 |
| OpenCPN 개발하기 02. wxWidgets 설치 (0) | 2022.01.24 |
| OpenCPN 개발하기 01.사전설치 (0) | 2021.12.02 |


